How to check for burn-in
- Turn brightness up. Use your normal brightness or higher and turn off auto-brightness. Faint burn-in that hides at low brightness becomes visible on a brighter field.
- Go fullscreen. Click the field or press F. Burn-in usually sits right at the edges — status bars, taskbars, navigation bars — so the field has to cover them. On an iPhone, rotate to landscape or add the page to your home screen for edge-to-edge coverage.
- Step through the grays. Space or → moves through 10%, 20%, 30% and 50% gray. Most burn-in is easiest to see between 20% and 50%.
- Then the colors. White, red, green and blue follow. OLED subpixels of each color wear at different rates, so burn-in often shows as a tint — for example a keyboard that looks slightly yellow on white or darker on red.
- Look in the right places. Check where static images spend the most time (see the table below). Move your head slightly: a real mark stays fixed to the screen.
- Found a ghost? Rule out retention. Run the wiper for 10–20 minutes, or let an OLED run its own refresh cycle, then check again. If it’s gone, it was temporary retention.
What burn-in looks like
On a uniform field, burn-in appears as a faint, slightly darker or tinted copy of something that was on screen for a long time. The illustrations below are exaggerated so the shapes are clear; on a real screen they are often subtle enough that you only see them once you know where to look.
Where to look
| Device | Common burn-in spots | Best field |
|---|---|---|
| Phone | Status bar (clock, battery, signal icons), navigation buttons or gesture bar, keyboard, always-on display clock, camera app controls, app bars of apps you use for hours | 50% gray, red, white |
| OLED monitor or laptop | Taskbar or dock, Start button, desktop icons, browser tabs and address bar, window title bars, code editor sidebars | 20–50% gray, white |
| OLED TV | Channel and network logos, news tickers, sports score bars, black letterbox bar edges, game HUDs (health bars, minimaps), streaming app menus | 20–30% gray, red, blue |
Burn-in or image retention?
| Image retention | Burn-in | |
|---|---|---|
| What it is | A temporary after-image from a static picture | Permanent uneven wear of the pixels |
| Goes away? | Yes — within minutes to hours of varied content or screen-off time | No |
| Screens | OLED and LCD (especially IPS) | OLED (and old plasma); rare on LCD |
| What to do | Show varied content, run the wiper, or let an OLED run its refresh cycle | Prevent it from getting worse; check the warranty |
Each OLED pixel makes its own light, and the organic material slowly loses brightness the more it is used. Pixels that show the same bright static element for thousands of hours age faster than their neighbors, so when you put up a uniform field, those pixels are slightly dimmer — that’s burn-in. Because red, green and blue materials age at different rates, the mark is often tinted rather than just darker.
The retention wiper
Press W or tap Wiper, choose a pattern and duration, and press Start. The test goes fullscreen and shows the elapsed time; when the timer ends it returns to 20% gray so you can check again.
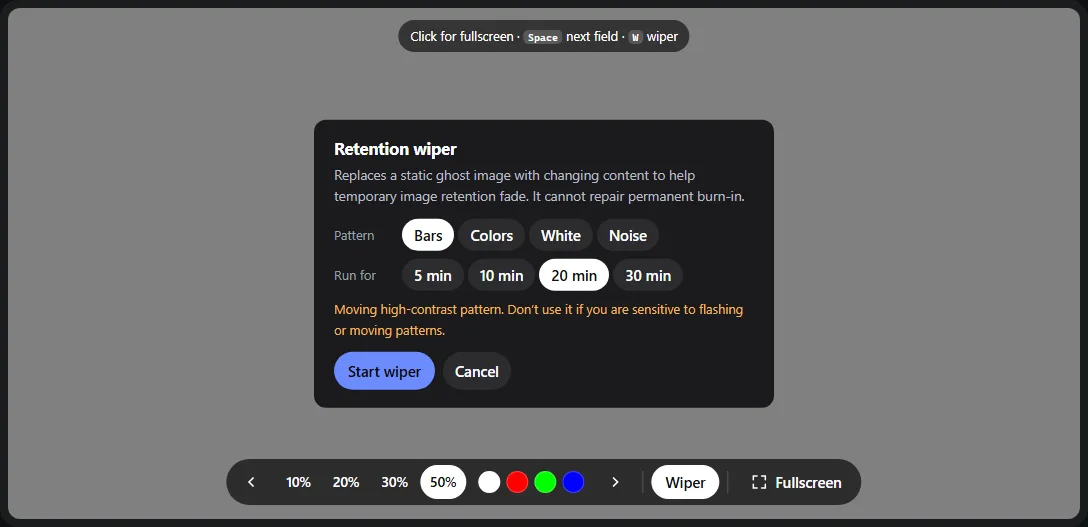
- 1Choose the pattern. Each one shows its own warning line underneath.
- 2How long to run. The wiper stops itself and returns to 20% gray.
- 3Start wiper goes fullscreen and starts the timer. Space or Stop ends it early.
- 4Wiper (W) opens and closes this panel.
- Bars — black and white bars scrolling across the screen, so every pixel switches between full on and off. Good general choice for LCD retention.
- Colors — the whole screen slowly cycles through the color wheel. Gentle, no flashing.
- White — a full white field. A classic for clearing LCD image retention; on OLED it adds wear evenly but is unnecessary — use the panel’s refresh instead.
- Noise — rapidly changing black-and-white static. Flashes; skip it if flashing bothers you.
Photosensitivity warning: the Bars and Noise patterns are high-contrast moving or flashing patterns. If you have photosensitive epilepsy or are sensitive to flashing light, use Colors or White, or don’t use the wiper.
OLED pixel refresh: where to find it
OLED TVs and monitors run a short compensation cycle automatically after they’ve been used for a while and are switched off with the remote or power button. It re-measures the pixels and evens them out, and it clears most temporary retention. Leave the screen plugged in after turning it off so it can run. There is also a longer manual cycle, which manufacturers intend for occasional use when a mark doesn’t clear — not as routine maintenance.
| Brand | Look for |
|---|---|
| LG OLED TVs | OLED Care → OLED Panel Care → Pixel Cleaning (older models: OLED Panel Settings → Pixel Refresher) |
| Sony OLED TVs | Panel refresh in the picture or display settings |
| Samsung OLED TVs and monitors | Pixel Refresh, in the panel care or device care settings |
| Dell / Alienware OLED monitors | Panel Health → Pixel Refresh (short) and Panel Refresh (long) |
| ASUS ROG OLED monitors | OLED Care → Pixel Cleaning |
| MSI OLED monitors | OLED Care in the on-screen menu |
| Phones and laptops | No manual refresh — the system compensates on its own |
Menu names vary by model year and firmware. If you can’t find it, search your model’s manual for “pixel refresh” or “panel care”.
How to prevent burn-in
- Hide static elements. Auto-hide the Windows taskbar or macOS dock, use gesture navigation on Android, and use a dark theme so bars and menus are dimmer.
- Keep the protection features on: pixel shift (Screen Shift on LG), logo brightness reduction (Logo Luminance Adjustment on LG), and the screen-saver or screen-off timers. They are on by default for a reason.
- Lower brightness for static content. A spreadsheet or code editor at 100% brightness for hours ages the panel much faster than the same content at a comfortable level.
- Vary what you watch. Hours of the same news channel or game every day is the classic burn-in recipe.
- Turn it off with the remote, not at the wall. That lets the automatic compensation cycle run.
Burn-in shows up best on a uniform field, but near-black problems on OLED are different — check those with the OLED test, and look for general patchiness with the gray uniformity test. A single colored dot that won’t go away is a stuck pixel, not burn-in: try the stuck pixel fixer.
Frequently asked questions
How do I check my screen for burn-in?
Turn brightness up to your normal level or higher, open this test in fullscreen and step through the gray fields — 20% to 50% gray shows most burn-in — then red, green and blue. Look at the places where static images sit: the status bar, navigation bar and keyboard on a phone, the taskbar on a PC, channel logos and game HUDs on a TV. A faint, darker or tinted copy of those shapes is burn-in or retention.
What is the difference between burn-in and image retention?
Image retention is temporary: a faint ghost of a static image that fades after a few minutes or hours of varied content or with the screen off. Burn-in is permanent — on OLED it is uneven wear of the pixels that showed the static image most, so they are permanently a little dimmer. If a ghost image is still there after a day of normal use and the panel’s own refresh cycle, treat it as burn-in.
Can OLED burn-in be fixed?
True burn-in cannot be reversed, because the affected pixels have physically aged more than their neighbors. What can help is the panel’s own compensation cycle (pixel refresh or pixel cleaning), which re-measures and evens out the pixels, and which often clears marks that turn out to be retention. Third-party “burn-in fixer” videos and wipers don’t repair worn pixels.
Does the retention wiper work on OLED?
It can help temporary retention fade by replacing the static image with changing content, but on OLED your first choice should be the built-in refresh: simply turn the TV or monitor off with the remote and leave it plugged in so the automatic short cycle runs. The wiper is most useful for image retention on LCD (especially IPS) screens.
Can LCD screens get burn-in?
LCDs can show temporary image retention, especially IPS panels after hours of a static, high-contrast image. It almost always fades with varied content or the wiper. Permanent burn-in on modern LCDs is rare. OLED (phones, TVs, monitors, many laptops) and older plasma TVs are the screens that actually wear unevenly.
How do I check a used phone for burn-in before buying it?
Turn brightness to maximum, open this page, go fullscreen and look at 50% gray, then red and white. Check the top status bar, the bottom navigation buttons or gesture bar and the keyboard area. Look for a slight pink, yellow or darker tint in any of those places — red and 50% gray show keyboard burn-in especially clearly.
Is burn-in covered by warranty?
It depends on the brand and product. Several OLED monitor makers now include burn-in in their warranty, while many TV and phone warranties exclude it or treat it as normal wear. Check the warranty terms for your exact model, and note when you first saw it.
Does dark mode prevent OLED burn-in?
It helps. OLED pixels only wear while they emit light, so dark backgrounds age the panel less overall, and dark mode reduces the brightness of static bars and menus. Varying what is on screen and lowering brightness for static content matter more, though.
Last updated . Runs entirely in your browser — nothing is uploaded.