How to run the uniformity test
- Warm the screen up for 20–30 minutes. Backlights and OLED panels both change slightly as they reach operating temperature, and a cold panel can look patchier than it really is.
- Set up like you watch. Use your normal picture mode and brightness. Turn off auto-brightness, eco or ambient light sensors so the level doesn’t drift during the test. Dim the room.
- Go fullscreen and sit centered. Click the gray area or press F, sit at your usual distance with your eyes level with the middle of the screen, and keep your head still — moving changes what you see at the edges.
- Step through every shade. Space or → moves through 5%, 10%, 20%, 25%, 50%, 75% and 100% gray, then red, green and blue (1–0 jump directly). Give your eyes a few seconds on each.
- Use the grid to compare zones. G cycles a 3×3 and a 5×5 grid. Compare each corner zone with the center and note the location of anything you see.
- Check for dirty screen effect. Press P on 5%–25% gray. Faint stripes scroll across the screen like a camera panning over a football pitch. Patches that stay still while the stripes move are DSE.
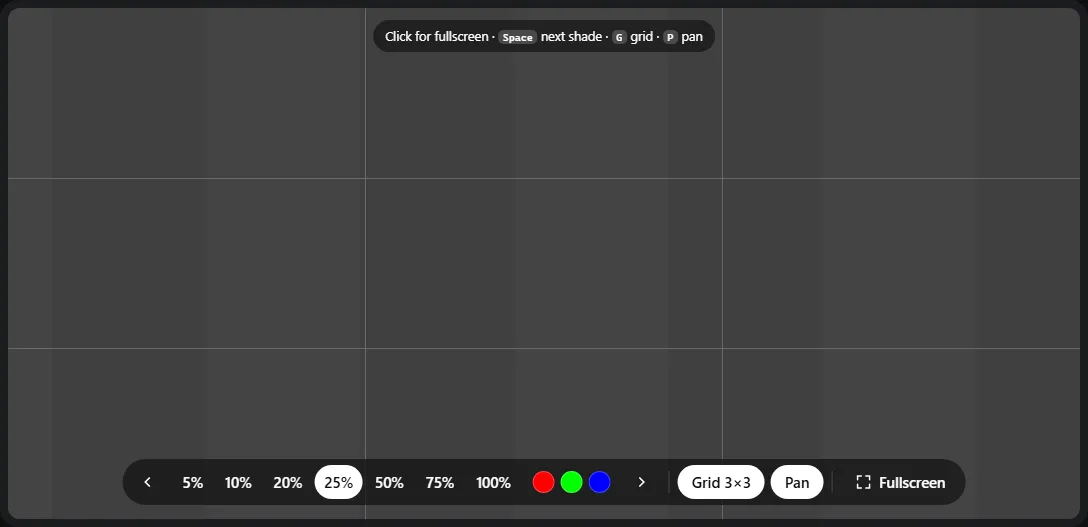
- 1Gray levels from 5% to 100% — keys 1–7.
- 2Red, green and blue fields — keys 8, 9, 0.
- 3Grid lines divide the screen into zones so you can compare corners with the center.
- 4Grid (G) cycles off, 3×3 and 5×5.
- 5Pan (P) scrolls faint stripes to expose dirty screen effect.
What to look for
The illustrations below are exaggerated so the pattern is easy to recognize. On a real screen these effects are usually subtle — that’s why a perfectly flat gray field is such a useful test.
Which shade shows what
| Shade | Best for |
|---|---|
| 5% and 10% | Near-black clouding on LCDs, vertical banding and near-black tint on OLED, uneven local dimming zones |
| 20% and 25% | Dirty screen effect, horizontal and vertical bands from the backlight structure |
| 50% | Overall brightness uniformity, vignetting, tint shifts between left and right |
| 75% and 100% | Bright-field uniformity, dust and debris behind the panel, color tint on bright web pages |
| Red, green, blue | Uniformity problems in one color channel; red and blue fields also make dead subpixels obvious |
For darker problems on LCDs, such as light leaking at the edges, use the backlight bleed test, which adds 1% and 3% gray and a pure black field. For a single gray at any level with no controls, use the gray screen.
Dirty screen effect and why panning matters
On a still gray field your eyes adapt to faint blotches and they fade from view. When the content moves and the blotches don’t, your visual system notices the mismatch immediately. That is why DSE is mostly talked about with sports: the camera pans across a big, nearly uniform area of grass or ice, and the screen looks like it has a dirty window in front of it.
Pan mode recreates that: faint vertical stripes, a few shades apart, scroll across your chosen gray at a steady speed in pixels per second. Watch the stripes pass over each area of the screen. A patch that keeps its shape while the stripes slide through it is part of the panel, not the picture.
Causes and fixes
LCD monitors and TVs
- Vignetting and edge darkness come from how the backlight light spreads, especially on edge-lit panels, and from viewing angle on large screens. Sit farther back to see how much is angle.
- DSE and clouding come from tiny variations in the diffuser and light-guide layers. Lower brightness makes them less visible; there’s no setting that removes them.
- Local dimming can create or hide patches. On a uniform field all zones should be at the same level, so if you see a grid of brighter and darker rectangles, try turning local dimming off to see whether the panel itself is uneven.
- Uniformity compensation: some professional monitors include a setting that evens out brightness and color across the screen at the cost of some peak brightness and contrast. Check your monitor’s on-screen menu for it.
OLED TVs, monitors and phones
- Vertical banding and near-black tint at 5% gray are common on OLEDs and vary from unit to unit. They are mostly visible on near-uniform dark content.
- Let the automatic refresh run. OLED TVs and monitors run a short compensation cycle after use, when they go into standby. Don’t unplug them right after switching off. Banding sometimes improves after a few of these cycles.
- Avoid forcing a manual pixel refresh as a routine fix — manufacturers intend the long manual cycle for occasional use. See the burn-in test for where to find it and the OLED test for more near-black checks.
When is it a defect?
Every panel has some non-uniformity, and manufacturers generally don’t publish limits for consumer displays. A practical rule:
- Normal: slight darkening at the very edges on 50% gray, faint blotches you can only find on a still 5% field after searching for them, mild angle-related shading on a large screen viewed up close.
- Worth returning: a patch or band you notice in normal content — sports pans, a dark film, a white document — from your usual seat; a distinct colored area (pink or green corner) on bright pages; a hard-edged shape or line.
Test inside your return window. Exchanges are a lottery; uniformity varies between units of the same model. While you’re at it, run the dead pixel test too.
Frequently asked questions
What is the dirty screen effect (DSE)?
Dirty screen effect is blotchy, uneven brightness that looks like smudges or a dirty window on the screen. It is most noticeable on large TVs when the camera pans across a big uniform area such as a football pitch, ice rink or sky, because the content moves but the blotches stay put. Use 5–25% gray and the Pan mode to see it.
Which gray should I use to test screen uniformity?
Use 5% and 10% gray for near-black problems such as clouding, OLED vertical banding and tinting; 20–25% for dirty screen effect; and 50% for vignetting, color tint shifts and general brightness uniformity. Step through all of them — each one reveals different issues.
Is some non-uniformity normal?
Yes. No LCD or OLED panel is perfectly uniform, and on a full-screen 5% or 50% gray most screens show something if you look hard enough. What matters is whether you notice it in normal content from your usual seat — for example, a dark patch that follows every camera pan in sports, or a pink tint on one side of a white web page.
Why are the corners and edges of my screen darker?
Two reasons. On a large or close screen you see the edges at an angle, and IPS, VA and even OLED panels get darker or shift in color off-axis — move back and see whether it changes. If it stays the same from any position, it is genuine vignetting from the backlight or panel, which is common on edge-lit LCDs.
Can dirty screen effect go away?
Sometimes it becomes less visible as the panel warms up, and on OLED TVs the automatic compensation cycle that runs in standby can reduce near-black banding. It does not usually disappear completely. If it bothers you in normal viewing, use the return window.
Why does my photo of the screen look darker at the corners than it really is?
Camera lenses naturally darken the corners of a photo (lens vignetting), and phone cameras add their own processing. Photos make almost every screen look less uniform than it is, so judge with your eyes and use photos only to show the location of a problem.
Does this work on TVs and phones?
Yes. On a smart TV, open the page in the TV’s browser and use the arrow keys on the remote to step through the shades. On a phone, tap the gray area for fullscreen and tap again to change the shade. Turn off auto-brightness while you test so the screen doesn’t change level mid-test.
Last updated . Runs entirely in your browser — nothing is uploaded.