Before you start
Calibrating by eye fixes the problems most screens actually have — crushed shadows, clipped highlights, wrong gamma, a blue or green cast and over-sharpening — in about ten minutes. Set the stage first so your adjustments hold:
- Warm up for 30 minutes. LCD backlights and OLED panels shift slightly as they warm up.
- Use your normal lighting, and avoid light falling directly on the screen.
- Native resolution, 100% browser zoom. Press Ctrl+0 (⌘+0). The gamma and sharpness patterns need one pattern pixel per screen pixel; the page warns you if that isn’t possible.
- Reset the picture settings in the monitor menu (often Factory reset or Reset picture), then pick the sRGB, Standard or Custom/User mode. On TVs, use Filmmaker Mode, Movie or Cinema.
- Turn off dynamic contrast, ECO/energy saving, ambient light sensors, Night Light (Windows), Night Shift and True Tone (Mac, iPhone, iPad), and low-blue-light modes. They change the picture constantly.
- Remove old corrections. NVIDIA Adjust desktop color settings and AMD Custom Color should be at their defaults, and any calibration profile from an earlier attempt should be removed so you start from a clean state.
The six steps
The wizard above shows the right pattern for each step, what you should see, and which setting to change. Work in this order — each step depends on the one before.
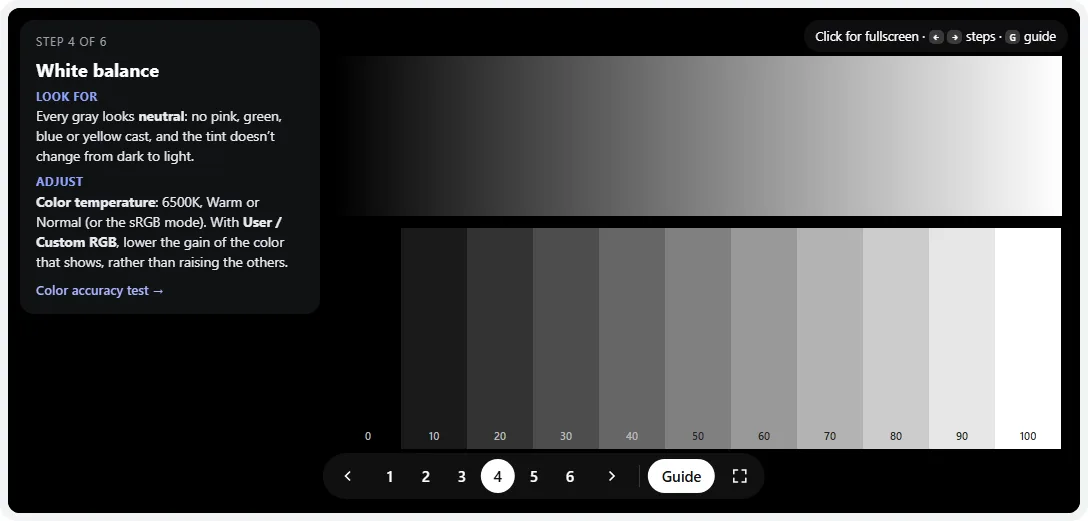
- 1The guide: what the pattern should look like and which monitor setting to change.
- 2Jump to any step (keys 1–6), or use ← →.
- 3Guide hides the card (G) so the pattern fills the screen.
- 4Fullscreen (F) — adjust while looking at the full-size pattern.
Here is the same sequence in more detail:
- Brightness (black level). Near-black squares 1–40 on pure black. You want squares 2 or 3 and up visible while the background stays black. On PC monitors the Brightness control is the backlight, so set it for comfort and fix crushed shadows with Gamma or by switching off dynamic contrast; on TVs Brightness is the black level. If only 20 and above are visible, your graphics card and display disagree about RGB range — the brightness test explains the fix.
- Contrast (white level). Squares 244–254 on pure white. Lower Contrast until you can see 252–254; going lower only dims white. If no square is visible at any setting, check the RGB range.
- Gamma. A chart of one-pixel lines with a solid strip down the middle of each column. Sit back or squint until the lines blur: where the strip disappears is your gamma. Aim for 2.2, and use the gamma test’s Match mode for a numeric reading per tone and channel.
- White balance (color temperature). A smooth gray ramp above and 10% steps below. Every gray should look neutral, from the darkest to the brightest. Choose the 6500K, Normal or Warm preset (or simply sRGB mode). If you use User RGB gains, lower the gain of whichever color you can see in the grays: raising gains clips highlights. Give your eyes a few minutes — after a cool, blue default, 6500K looks yellowish at first.
- Sharpness. Four tiles of one-pixel lines and checkerboards on a matching gray, plus text on white, black and gray. From a distance the tiles should blend into the gray, and up close text should be crisp without light or dark outlines (halos). Turn Sharpness down until halos disappear, but not so far that text gets soft. Most monitors look best at their default; most TVs at 0 or close to it.
- Final check. Seven color bars of 32 steps. Every step should be distinct at both ends. A color that merges at the bright end means its RGB gain is too high; merging at the dark end means crushed shadows.
Adjust the monitor first, the computer second. Changes made in the monitor’s own menu keep all 256 levels of every channel. Corrections made in Windows, macOS or the graphics driver squeeze the signal before it leaves the computer and can add banding. Use them only for what the monitor can’t do.
Calibrate with Windows “Calibrate display color” (dccw)
Windows has a built-in calibration wizard. It saves a profile and loads gamma and color-balance corrections into the graphics card, so use it after you have done what you can in the monitor menu.
- Press Win+R, type
dccwand press Enter — or search the Start menu for Calibrate display color. With several monitors, drag the wizard onto the one you want to calibrate. - Set basic color settings: the wizard asks you to reset the monitor to its defaults. Click Next.
- Adjust gamma: move the slider until the small dots in the middle of the circles are as invisible as possible. This is the same principle as our gamma chart.
- Adjust brightness and contrast: on a desktop monitor, use the monitor buttons as the wizard shows (dark suit and shirt image for brightness, white shirt for contrast). On a laptop, click Skip brightness and contrast adjustment — and use the brightness slider instead.
- Adjust color balance: move the red, green and blue sliders until the gray bars have no color cast. Move the slider of the color you see down rather than pushing the others up.
- Compare: use Previous calibration / Current calibration to compare, then click Finish to keep it. Leave the ClearType Tuner box ticked if you want to tune text rendering next.
To undo it, open the classic Color Management panel (run colorcpl), select your display, and remove the profile named CalibratedDisplayProfile. For HDR displays, Microsoft’s separate Windows HDR Calibration app (from the Microsoft Store) sets HDR black level, peak brightness and saturation; it doesn’t replace SDR calibration.
Calibrate on a Mac (Display Calibrator Assistant)
- Open System Settings → Displays and select the display.
- Open the Color profile menu and choose Customize….
- Click + to start Display Calibrator Assistant.
- Follow the steps. On current macOS versions it mainly lets you pick a target white point (D65 is the standard choice) and then saves a new profile, which becomes the display’s active profile.
Built-in Apple displays and Apple’s external displays are factory calibrated; keep their default profile unless you see a clear problem. Some Apple Pro displays also offer reference modes under Presets. For third-party monitors, set the monitor menu with the steps above first: the Mac’s profile can’t fix clipped highlights or crushed shadows. Turn True Tone and Night Shift off while you calibrate.
Phones, tablets and TVs
- iPhone and iPad: no calibration controls, but they are well calibrated from the factory. For neutral color, turn off True Tone and Night Shift in Settings → Display & Brightness.
- Android: pick the most accurate color mode — Samsung: Settings → Display → Screen mode → Natural; Pixel: Settings → Display → Colors → Natural. Other brands use names like Standard or sRGB.
- TVs: start from Filmmaker Mode, Movie or Cinema with the warmest standard color temperature (often Warm2 or a value such as Warm 50). Set Brightness with step 1 and Contrast with step 2, and turn Sharpness, noise reduction and motion smoothing down or off. Open this page in the TV’s browser, or cast it from a laptop.
When to use a colorimeter
Calibration by eye gets the settings right; it can’t make colors exactly right. A colorimeter (for example from Calibrite or Datacolor) measures the screen’s actual light, and software — the maker’s own app or the free DisplayCAL/ArgyllCMS — builds a profile that corrects white point, gamma and color for the measured result. It’s worth it if you edit photos or video for others, print, or match several screens. Monitors with hardware calibration (such as EIZO ColorNavigator, BenQ Palette Master or ASUS ProArt models) store the correction inside the monitor, which avoids banding.
Next, check the result: run the color accuracy test for gray neutrality and reference colors, and the color banding test to make sure no correction has introduced steps in gradients.
Frequently asked questions
Can I calibrate a monitor without a colorimeter?
You can adjust it well by eye: black level, white clipping, gamma, sharpness and an obvious color cast are all visible with the right patterns, and that fixes the most common problems. What you can’t do by eye is hit exact color temperature, accurate colors or a precise grayscale — that takes a colorimeter, which measures the light and builds a correction profile.
What are the best monitor settings for everyday use?
Start from the sRGB or Standard picture mode, gamma 2.2, color temperature 6500K (often called Warm or Normal), Contrast at the factory default, Sharpness at the default, and dynamic contrast, ECO and ambient light modes off. Set Brightness to a comfortable level — roughly the brightness of a sheet of white paper in your room.
How do I calibrate my monitor on Windows 11?
Press Win+R, type dccw and press Enter (or search for “Calibrate display color”). The wizard walks you through gamma, brightness, contrast and color balance and saves the result as an ICC profile. Do the monitor’s own settings first with this page; use the wizard only for what the monitor can’t do.
How do I calibrate my display on a Mac?
Open System Settings → Displays, open the Color profile menu and choose Customize…, then click + to start Display Calibrator Assistant. On current macOS it mainly lets you choose a white point and saves a new profile. Apple’s own displays are factory calibrated, so the main reason to use it is a visible color cast.
What color temperature should I use?
6500K (D65), the white point of sRGB, Windows, macOS, the web and video standards. Monitors label it 6500K, Normal, Standard or Warm depending on the brand; TVs usually get closest in their Warm or Warm2 setting. Cooler (bluer) settings look brighter but less accurate.
How often should I calibrate my monitor?
By eye: whenever you change picture mode, cable, graphics driver or room lighting. With a colorimeter, every one to three months is common for photo and video work, because backlights and OLED panels drift slowly as they age.
Why does my calibration look yellow?
Most screens ship much cooler (bluer) than 6500K because blue looks brighter in a store. After switching to 6500K your eyes need a few minutes to adapt; within 10–15 minutes the “yellow” usually looks like plain white.
Last updated . Runs entirely in your browser — nothing is uploaded.