How to run the dead pixel test
- Clean the screen first. Wipe it with a dry microfiber cloth. Dust and smudges are the most common false alarm.
- Go fullscreen. Click the color area or press F. The test color has to cover every pixel, including the very edges and corners.
- Step through all nine colors. Press Space, → or click to advance (← goes back). On each color, scan the screen in rows from top to bottom. Turn on the grid (G) to divide the screen into nine zones so you don’t miss an area.
- Mark anything suspicious. Press M, then click the dot. A marker records its exact physical pixel position and which color you found it on. On a touch screen, tap Mark and then tap the dot.
- Confirm it. Wipe the screen again and cycle through the colors. A real defect stays perfectly under its marker. Then copy the report to send with a return or warranty claim.
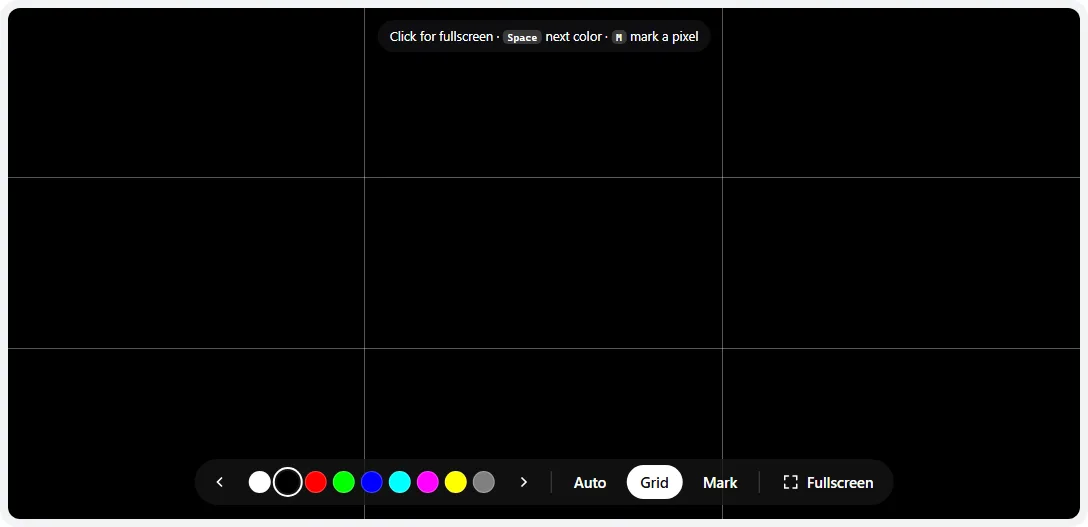
- 1Previous / next color — or ← →, Space, or click the screen.
- 2Jump straight to any of the nine test colors (keys 1–9).
- 3Auto changes color every 4 seconds for a hands-free pass.
- 4Grid splits the screen into nine zones so you scan systematically.
- 5Mark lets you click a defect to record its exact pixel position.
- 6Fullscreen — essential: the test must cover the edges of the panel.
Look from a normal viewing distance first, then move closer to check anything that catches your eye. Run the test at your usual brightness — very low brightness makes dark defects harder to see on white.
What you are looking for
Each pixel on an LCD or OLED is made of three subpixels: red, green and blue. A defect is one or more of those subpixels stuck permanently off or on. The close-ups below show how each type of defect looks on the color where it is easiest to spot.
Which color shows which defect
| Defect | Looks like | Easiest to see on |
|---|---|---|
| Dead pixel | Black dot | White, gray, any bright color |
| Hot pixel | White dot | Black |
| Stuck red / green / blue subpixel | Red, green or blue dot | Black, then the other two primaries |
| Two stuck subpixels | Yellow, cyan or magenta dot | Black |
| Dead red / green / blue subpixel | Dark or tinted dot | Its own color: a dead green subpixel is a dark dot on green and magenta-ish on white |
| Dust or debris | Soft, slightly blurry speck, often bigger than a pixel | White — and it moves when you wipe or change your angle |
Dead pixel, stuck pixel or dust?
Before you start a return, rule out the easy explanations:
- It moves or smudges when you wipe the screen: dust or residue on the glass.
- It looks slightly out of focus and casts a faint shadow: a particle trapped between the panel layers or under a screen protector. It is not a pixel defect, though it may still be covered by warranty.
- It is pin-sharp, exactly one pixel, and appears in the same place on every color it should: a pixel defect. Use the marker to confirm the position stays the same.
- A whole line or a block of pixels is affected: not a pixel defect but a panel, cable or driver fault. These are almost always covered by warranty.
Found one? What to do next
- Stuck (colored) pixel: run the stuck pixel fixer over it for 10–30 minutes. It works on a meaningful share of stuck pixels, especially new ones.
- Dead (black) pixel: software can’t revive it. Massage methods risk damaging the panel and are not worth it on a display that is still under warranty.
- Check the return window first. Most stores accept returns of a new display for any reason within a set period, which is easier than proving a warranty defect.
- Then check the manufacturer’s pixel policy. Many brands only replace a panel once it exceeds a set number of defects, and bright (stuck or hot) pixels are usually treated more strictly than dark ones, especially near the center of the screen.
The marker report you can copy above lists each defect with its pixel coordinates and the colors it was spotted on, which is exactly what a support agent will ask for.
Typical pixel-defect allowance (ISO 13406-2 Class II)
Many manufacturers base their policies on this older ISO standard. It allows, per million pixels:
| Defect type | Per million pixels | 1920 × 1080 (2.1 MP) | 3840 × 2160 (8.3 MP) |
|---|---|---|---|
| Type 1 — always lit (hot) | 2 | 4 | 16 |
| Type 2 — always dark (dead) | 2 | 4 | 16 |
| Type 3 — stuck or dead subpixel | 5 | 10 | 41 |
Totals are rounded down. The standard was replaced by ISO 9241-307, and each manufacturer publishes its own rules — many premium monitors and most phones are held to a stricter standard. Always check the policy for your exact model.
Tips for an accurate test
- Check the edges and corners. Bezels and screen protectors hide defects, and the preview on this page does not reach the edge of your screen — fullscreen does.
- Test at native resolution and 100% browser zoom. This test colors every pixel either way, but the marker coordinates are only exact at native resolution.
- Use auto-cycle for a hands-free pass. Press A to change color every 4 seconds while you sit back and scan.
- New monitor? While you are at it, check for backlight bleed and uniformity — they are more common than dead pixels and also matter for a return.
Frequently asked questions
How do I check my screen for dead pixels?
Wipe the screen, open this page, and press F or click the color area to go fullscreen. Step through each color with Space and scan the whole screen slowly, edge to edge. A dead pixel shows up as a black dot on white and colored screens; a stuck pixel shows up as a bright red, green or blue dot, easiest to see on black.
What is the difference between a dead pixel and a stuck pixel?
A dead pixel receives no power, so all three of its subpixels stay off and it looks black on every color except black. A stuck pixel has one or two subpixels permanently on, so it glows red, green, blue (or a mix like yellow or cyan) and is most obvious on a black screen. A hot pixel is the opposite of a dead pixel: all three subpixels are stuck on, so it is white on black.
Can dead pixels be fixed?
A truly dead pixel usually cannot be fixed by software, because the transistor that drives it has failed. Stuck pixels are different — they can sometimes be revived by rapidly flashing colors over them. Try our stuck pixel fixer for 10–30 minutes. If the defect is still there, use your warranty or return window.
Is it a dead pixel or just dust?
Dust sits on top of the glass, so it casts a soft, slightly blurry shadow and often looks a little larger than one pixel. Wipe the screen with a microfiber cloth and look again from a different angle: dust moves or disappears, a dead pixel stays perfectly sharp and exactly one pixel in size. Mark it with the marker tool (M) and check whether it is still under the marker after cleaning.
How many dead pixels are acceptable?
It depends on the manufacturer. Many follow the ISO 13406-2 “Class II” limits — up to 2 always-on pixels, 2 always-off pixels and 5 stuck subpixels per million pixels — which allows a handful of defects on a 4K panel. Premium lines often promise zero bright pixels. Check your brand’s pixel policy and test within the store’s return window, which is usually more generous than the warranty.
Does this dead pixel test work on phones, tablets and TVs?
Yes. It works in any modern browser. On a phone, tap the color area to go fullscreen and tap again to change color. On iPhone, Safari doesn’t allow true fullscreen for web pages, so the test fills the browser window instead — rotate to landscape or add the page to your home screen for an edge-to-edge view. On a smart TV, use the TV’s browser and the remote’s arrow keys.
Can a dead pixel spread or get worse?
A single dead pixel does not “infect” its neighbors. However, if several pixels fail along a line, or new ones keep appearing, it usually points to a failing driver board, a damaged panel or a loose connection rather than an isolated defect — get the display checked while it is under warranty.
Why does the test look different in the small preview?
In the preview the browser chrome and page around the color area can distract your eye, and the edges of your screen are not covered. Always run the final check in fullscreen so every pixel on the panel shows the test color.
Last updated . Runs entirely in your browser — nothing is uploaded.