How to run the OLED test
- Turn the lights off. True black and near-black detail can only be judged in a dark room. Room light reflecting off the screen hides everything below a few percent.
- Use your normal picture mode and brightness. On a phone, turn off auto-brightness. Turn off dynamic contrast or “black enhancer” style settings for now — you can compare with them on later.
- Go fullscreen. Click the test or press F. The controls and cursor disappear after two seconds.
- Work through the five patterns with ← → or 1–5 (tap the screen on a phone). ↑ ↓ change the gray level on Near-black and the speed on Smearing.
What each pattern shows
Black steps: true black and black crush
Ten squares at pixel values 1 to 10 (out of 255) on a background of 0. On an OLED, value 0 means the pixels are off, so the background should be indistinguishable from the panel switched off — no gray haze and no glow at the edges like an LCD has (that’s what the backlight bleed test checks).
| What you see | What it means |
|---|---|
| Background is pure black, steps visible from about 3–5 upward, each a little brighter | Normal. Steps 1–2 are often invisible on OLED, especially at low brightness. |
| Steps up to 6–8 or more are invisible | Black crush — shadow detail is being lost. Raise brightness / black level, or turn off contrast enhancers. |
| Background looks dark gray, all steps easy to see | Raised black. Usually an RGB range mismatch (see below), a brightness setting set too high, or room light reflecting off the screen. |
| Steps visible but some look green, pink or purple | Near-black tint — common on OLED and varies between units. |
PLUGE: setting brightness
PLUGE (picture line-up generation equipment) is the pattern studios use to set black level. This version shows bars at values 1, 2 and 4 on a black background, with a white reference patch to set your eyes’ adaptation. Set the screen’s brightness (on TVs often called black level) so bar 4 is clearly visible, bar 2 is just visible and the background stays pure black. If bar 1 is easy to see and the background is gray, black is set too high. The brightness test has more black-level patterns for LCDs.
Near-black: banding, blotches and tint
A uniform full-screen field at 1%, 2%, 3% or 5% gray. These levels are where OLED panels are least uniform, because each pixel is running at a tiny fraction of its current. Look for:
- Vertical or horizontal banding — columns or rows of slightly different brightness, very common at 1–5% on large OLED TVs.
- Blotches or mura — irregular patches; on phones this sometimes looks like a grainy “sand” texture at low brightness.
- Tint — the field or part of it looking green, magenta or purple instead of neutral gray.
- Flicker — shimmering at low brightness, often from PWM dimming on phones. The flicker test explains the camera method to confirm it.
For brighter gray levels (10% to 75%), use the gray uniformity test.
Ramp: near-black gradation
32 stepped bands from value 0 to 31 (0–12%). Each band should be a slightly brighter neutral gray than the one before it. Uneven jumps, two neighboring bands that look identical, or colored bands mean the screen handles near-black gradation poorly, which shows up as blocky shadows and banding in dark films.
Smearing: dark-scene motion
Dark gray squares (2%, 5%, 10%, 20% and 50%) move across black at a steady speed in pixels per second; the bottom row reverses it, with black squares on dark gray. OLED pixels usually switch in well under a millisecond, but on some panels — especially phones — switching on from fully off to a very dark level is much slower. That leaves a dark or purple trail behind the darkest squares. On a VA LCD you will see similar “black smearing”. Use the ghosting test for general motion clarity.
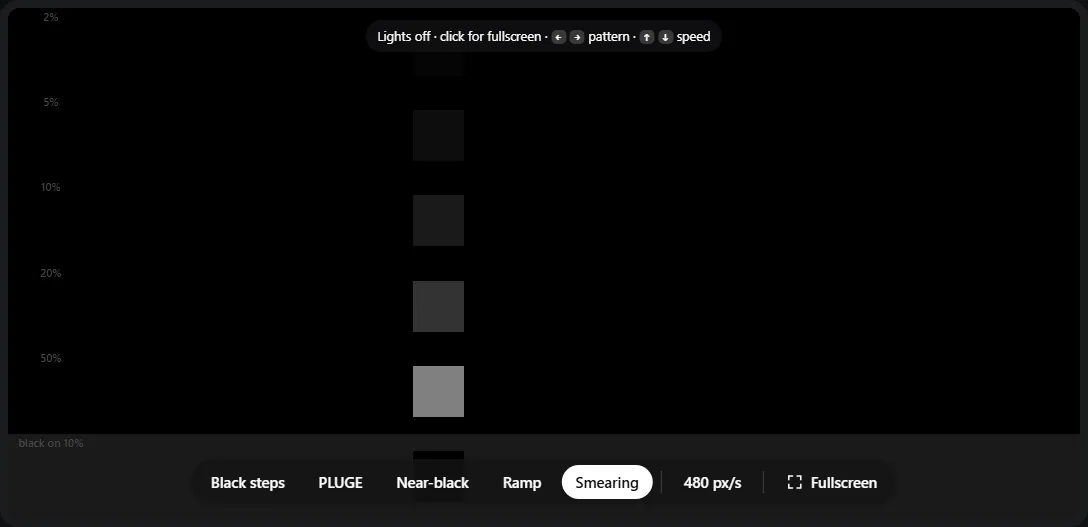
- 1The darkest squares (2% and 5% gray). This is where OLED black smearing shows first.
- 2Each row is labeled with its gray level.
- 3The five patterns — 1–5 or ← →.
- 4Speed in pixels per second (240, 480 or 960) — ↑ ↓.
Raised or crushed blacks? Check these settings
Most “my OLED blacks look gray” and “I can’t see anything in dark scenes” problems are settings, not the panel.
- RGB range mismatch (PC to TV over HDMI). A PC sends full-range RGB (0–255); TVs often expect limited range (16–235). If the PC sends limited and the TV expects full, blacks look gray. If the PC sends full and the TV expects limited, shadows are crushed. Match them: on the PC, NVIDIA Control Panel → Change resolution → Output dynamic range; AMD Software → Display → Pixel Format. On the TV, look for Black Level or HDMI Black Level.
- Brightness / black level set wrong. On TVs the “Brightness” control sets the black level, not the light output. Use the PLUGE pattern.
- Contrast and shadow enhancers. Settings like dynamic contrast, black stabilizer, dark-area detail or gamma presets change near-black detail. Compare with them on and off.
- Room light. On a QD-OLED, room light lifts black to a dark gray (they have no polarizer). Judge black in a dark room.
- Phones at low brightness. Some phones handle near-black differently below a certain brightness. Test at medium brightness too.
WOLED, QD-OLED and phone OLEDs
| Type | Found in | Typical near-black traits |
|---|---|---|
| WOLED (white OLED + color filters) | LG OLED TVs and monitors, many other OLED TVs | Vertical banding and slight tint at 1–5% gray; true black in any light |
| QD-OLED (blue OLED + quantum dots) | Samsung and Sony OLED TVs, many OLED gaming monitors | Very saturated color; black looks lifted and purplish in bright rooms |
| Phone and laptop OLED (RGB) | Most phones, many laptops and tablets | Low-brightness PWM flicker, near-black mura and tint, black smearing in motion |
Is it a defect?
Near-black banding and tint exist to some degree on most OLEDs and vary between units, so they are rarely treated as warranty defects unless they are clearly visible in normal content. What is not normal: a gray or glowing black on an OLED in a dark room (once settings are ruled out), a hard-edged line or band at any level, colored blotches visible at 20% and above, or permanent ghost images, which the burn-in test checks for. Test inside your return window if something bothers you in real content.
Frequently asked questions
How do I know if my OLED shows true black?
In a dark room, go fullscreen on Black steps. The background is pixel value 0; on an OLED those pixels are switched off, so the background should look exactly like the screen does when it is turned off, with no glow at the edges. If the black looks gray, check the HDMI black level / RGB range setting first.
Why can’t I see the first few near-black steps?
Steps 1 and 2 are extremely dark (well under 1% brightness), and many OLEDs and phones at low brightness show them as black. From about step 3–5 upward, each square should be visible and a little brighter than the last. If everything up to 6–8 is invisible, shadows are being crushed: raise brightness or black level, or check that the picture mode isn’t adding contrast.
Why does my OLED have a green or pink tint in dark scenes?
Each OLED pixel is driven at extremely low currents near black, and small differences between subpixels show up as a slight green, magenta or purple cast on very dark grays. It varies between units and is most visible on the Near-black field at 1–2%. A firmware update or the panel’s refresh cycle sometimes improves it; it is otherwise a panel trait rather than a setting.
What is black smearing on OLED?
When a dark object moves over pure black, pixels have to switch on from fully off, which is slower on some OLED panels (especially phones) than other transitions. The result is a dark, sometimes purple trail behind moving dark objects. The Smearing mode shows dark gray squares moving over black so you can see whether your screen does it.
Why does black look gray on my QD-OLED in a bright room?
QD-OLED panels have no polarizer layer, so room light reflecting off the screen lifts black to a dark gray, sometimes with a purple tint. In a dark room the same screen shows true black. It is how the technology behaves, not a defect.
What is OLED VRR flicker?
With G-Sync, FreeSync or HDMI VRR on, an OLED’s near-black brightness changes slightly with the refresh rate. When a game’s frame rate swings (loading screens, menus), dark areas flicker. A browser can’t vary the refresh rate on purpose, so check it in the game itself and see the flicker test for workarounds.
Can I use this test on an OLED phone?
Yes. Open the page, tap the test area for fullscreen and tap again to switch patterns. Set brightness to your usual level — at low brightness many phones change how they drive near-black pixels, so test at both a low and a medium setting.
Last updated . Runs entirely in your browser — nothing is uploaded.